


Tile Painting Preparation for New Jersey Homeowners
The costliest tile-painting mistake often happens before the coating container opens. Homeowners may focus on color while loose tile, failed grout, or hidden dampness determines whether the wall provides a dependable base. A clean-looking tile surface is not automatically ready for coating. Preparation begins by separating what can be painted from what must first be repaired, renewed, or allowed to dry.
Bathroom wall tile should be firm and dry before technical surface preparation begins. The project also needs a clear plan for grout, caulk, fixtures, and wall edges. Homeowners can help by reporting moisture concerns and clearing access without applying last-minute cleaning or bonding products. At A-1 Tub & Tile Refinishers, we then prepare the approved surfaces according to their actual condition.
Decide What Gets Coated and What Gets Repaired
Tile faces, grout joints, flexible caulk, and metal fixtures do not behave as one continuous material. A dependable scope identifies which surfaces will receive the finish and which joints need removal or renewal. The 2024 Tile Council of North America Handbook treats wet-area guidance, grout-joint design, substrate preparation, and flatness as distinct parts of a tile assembly. That distinction matters because a coating should not conceal a joint that still needs to move or a substrate that lacks support. The repair and coating boundaries should therefore be settled before preparation begins.
We approach the visit as a consultation, not an automatic recommendation to coat every surface. We have advised homeowners to keep tile or flooring that was already sound and attractive, then focus the work on the parts of the bathroom that would benefit from refinishing. That recommendation can reduce unnecessary work and produce a more coherent result. Every surface included in the estimate should have a practical reason for being there.
| Area or condition | Preparation decision | Why the decision comes first |
| Firm glazed wall tile | Evaluate for professional cleaning, preparation, primer, and coating | The tile face provides the intended finish surface |
| Missing or loose grout | Remove unstable material and renew the joint | Weak grout should not remain beneath a new coating edge |
| Cracked or peeling caulk | Remove and reseal it as specified | Flexible joints move differently from tile |
| Loose or hollow tile | Repair or reset it before painting | A coating cannot restore the bond behind the tile |
| Bulging tile or recurring dampness | Investigate the substrate and moisture source | The visible tile may be reacting to a condition behind the wall |
| Glass tile | Discuss a different finish or design solution | We do not treat glass as a routine tile-painting candidate |
| Faucets, trim, and accessories | Confirm the removal or masking plan | Clean edges require an agreed project boundary |
Check Tile Tightness, Grout, and Wall Shape
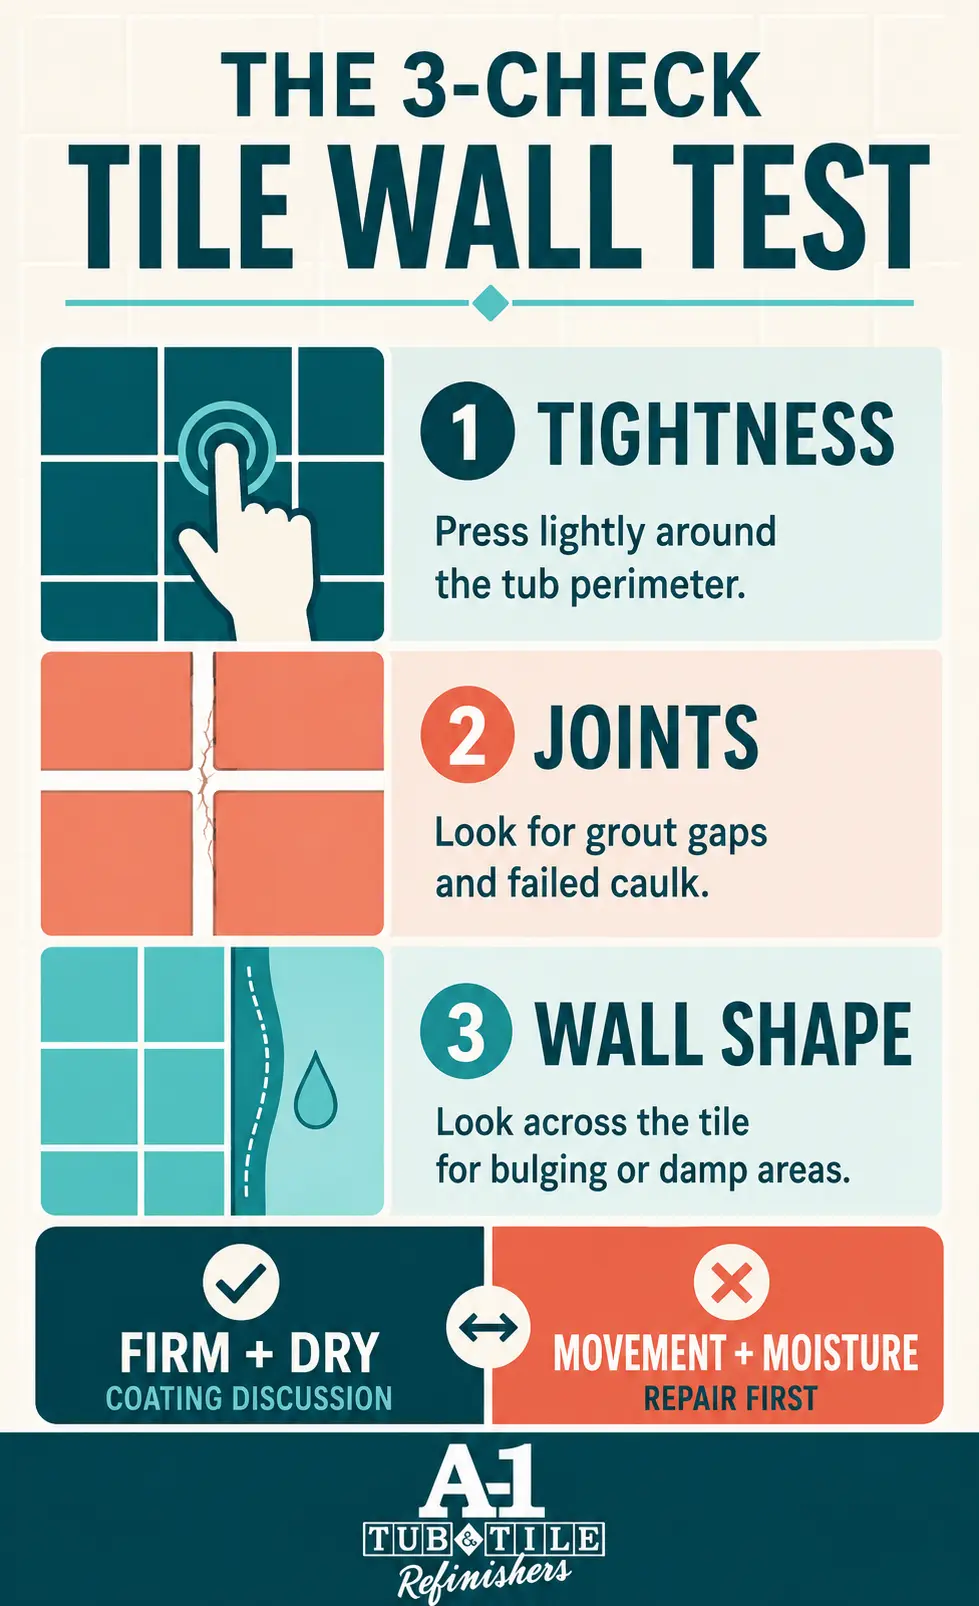
Our hands-on condition check is simple but deliberate. Around the tub perimeter, we press lightly to confirm that the tile feels tight. We inspect the grout lines for gaps and look across the wall for bulging that may indicate moisture behind the tile. These observations help us distinguish a coating project from a repair issue before preparation starts. The scope is based on how the tile assembly behaves, not only on how its color looks.
Paint changes the face of a tile, not its bond to the wall. A loose tile continues moving after painting, placing stress on the finish near its edges and joints. A 2025 peer-reviewed review of more than 690 tile-adhesive samples identified the adhesive-to-tile contact as the controlling interface in the hardened tile systems examined. That finding explains why shifting edges and cracked adjoining joints deserve attention before coating. Restoring support must come first because a decorative finish has no structural role.
Homeowners can document suspicious areas without pulling on the tile:
- Mark a questionable location by placing removable painter’s tape beside it.
- Note whether the tile shifts under light hand pressure or differs from neighboring tiles.
- Photograph grout gaps, raised edges, cracks, or changes in the wall’s shape.
Do not pry at a tile or inject adhesive immediately before the estimate. An attempted repair may hide movement without correcting the reason it started. Leaving the condition visible helps us determine whether the project needs one localized repair or more extensive work. It also prevents a small concern from turning into last-minute wall damage.
Stop Active Moisture Before Surface Preparation
Recurring dampness is a repair issue rather than a cleaning task. A stain that returns, a musty odor, or grout that darkens soon after drying deserves investigation before tile painting. In its 2025 mold remediation guidance, the National Institute for Occupational Safety and Health explains that mold growth points to a water or moisture problem. The agency also warns that painting over water-damaged or moldy material can lead to further problems. The proper order is to stop the water source, dry the assembly, address damaged material, and then reassess the tile.
A one-time splash mark differs from discoloration that repeatedly appears in the same place. Photograph the area after the bathroom has dried and check it again following normal use. Report failed caulk, loose plumbing trim, or recent repairs behind the wall. That history helps us distinguish ordinary surface soil from a condition that should delay coating work.
Repair Grout and Caulk Before Coating
Loose grout and failed caulk need attention before the coating reaches those edges. Our preferred sequence is to remove unstable material, renew the joint, and then complete the approved coating preparation. That creates a clean boundary instead of asking paint to hold together material that already moves or crumbles. The repair scope should therefore be settled before the color decision.
Grout and caulk also perform different jobs. Grout fills the joints between tiles, while caulk accommodates movement at corners and transitions. Treating both as ordinary tile can create an unclear or unreliable edge. At A-1, our related services include wall-tile regrouting, grout cleaning, caulking, and steam cleaning, allowing those conditions to be addressed within a coordinated scope when appropriate.
Leave Adhesion Preparation to the Coating Process
Household cleaning and professional coating preparation serve different purposes. Soap film, hard-water deposits, wax, and silicone-based products can leave residues that affect the bonding surface. Our documented reglazing process includes degreasing, an adhesion primer, and spray-applied topcoats. Mike emphasizes that the preparation completed before spraying is what creates the foundation for the finish. Homeowners should therefore avoid sanding, acid etching, filling, or applying bonding products unless we provide specific instructions.
Tell us about products recently used on the wall even when no residue is visible. Grout sealer, polish, adhesive remover, and oily cleaners may affect the preparation sequence. Keep the container or take a photograph of its label if the name is uncertain. That information lets the technician plan the appropriate cleaning and adhesion steps.
Prepare the Bathroom Without Altering the Tile
The homeowner’s most useful preparation is clearing access and protecting the schedule. Finish normal bathroom use early enough for the area to dry before the appointment. Remove personal belongings instead of stacking them elsewhere in the room. Ask us which attached accessories should remain for professional removal or masking.
- Remove towels, toiletries, shower curtains, bath mats, and movable storage.
- Clear the route from the home’s entrance to the bathroom for tools and equipment.
- Keep the work area unused for the drying and access period we specify.
Do not remove caulk, plumbing trim, or mounted hardware unless the approved scope assigns that work to you. A broken fitting or damaged wall edge creates an unnecessary last-minute repair. Confirm parking, building access, water-shutoff needs, and permitted work hours before the appointment. Condo and multifamily homeowners should also arrange any required management access.
Send Photographs That Show the Whole Tile Field
Useful photographs show both the project boundary and the condition of individual problem areas. Natural room light usually provides a clearer image than a close flash reflected off glossy tile. Include enough distance to show where the tile meets the tub and adjacent walls. Follow that overview with close images of locations requiring a repair decision.
- Send one full-wall image showing the complete tile field.
- Add one corner image showing the tub edge, caulk, and plumbing trim.
- Include one close view of every loose tile, crack, stain, or failed joint.
Mention the age of any previous tile coating, grout repair, or caulk work if known. State whether stains return after bathing and whether a plumber has corrected the source. Identify the desired color and any surfaces that should remain unchanged. These details give the estimate a defined scope instead of a general request to paint the bathroom.
Set the Tile Up for a Dependable Finish
Successful tile painting begins with a dry, stable tile assembly and an agreed boundary for every joint and fixture. Homeowners should report moisture, identify movement, clear access, and leave technical surface preparation to the refinishing process. Our consultation may recommend repairs first or determine that some attractive surfaces should remain unchanged. Send A-1 Tub & Tile Refinishers full-wall and close-up photographs along with notes about moisture, grout, caulk, prior coatings, and loose tile. Contact us to confirm the repair scope and receive preparation instructions for your New Jersey tile-painting project.